USB Support for Home Assistant in Hyper-V
Posted on October 23, 2020 • 13 minutes • 2563 words
Table of contents
If you’re running Home assistant in Hyper-V, you’ve probably encountered a significant limitation… Hyper-V doesn’t let you pass-through a USB device, so you can’t use your Z-Wave dongle or zigbee dongle.
So why am I writing this blog post? I have found a way to make it work, feast your eyes on the following screenshot!

Click to enlarge. Z-Wave USB dongle available to Home Assistant container inside Hyper-V
The left side is Home Assistant’s frontend in the web browser, open to the Open Z-Wave Add-On page. Notice in the yellow highlight, that is a Z-Wave USB dongle plugged into the Windows 10 machine.
On the right side is the Hyper-V Manager, where you’ll see a VM named “Debian10”. This is a clean version of Debian 10.6, installed using amd64 ISO downloaded from the Debian downloads page
and HyperV Quick Create.
Home Assistant Supervised on Debian
A very important fact about this setup is that I installed Home Assistant Supervised on top of Debian. Most people boot directly into Home Assistant OS (fka Hassio) on a Raspberry PI or a virtual appliance. I need a Linux host OS to passthrough the USB to.
Now, back to the Z-Wave device visible in Home Assistant. That is actually a USB dongle plugged into the host Windows 10 machine, so how it is available inside Debian VM? Hyper-V doesn’t have USB passthrough?
Solution - USB over IP
The solution for me was to use USB over IP. I am actually serving the USB device over IP from the Windows host to the Debian client using two different solutions USB Network Gate and USB Redirector (I will show you how to use both in this article). Ultimately, Home Assistant doesn’t know any difference, it appears and works the same as if you plugged it into a USB hub.
This tutorial is broken down into 3 easy to follow phases
- Phase 1. Making sure you have the prerequisites installed
- Phase 2. Implementing a USB over Ethernet solution
- Phase 3. Using the USB Device in Home Assistant
Okay, lets get started!
Update: Great suggestion from Cristi in the comments. You can also check out USBIPD as an option for sharing a USB connected device to the Hyper-V hosted OS.
Phase 1. Prerequisites
If you’re not already running Debian 10.x in Hyper-V, you should install that now. You can download the ISOs for x64 here
(you want amd64’s dvd-1.iso, dvd-2 and dvd-3 are optional). Here’s a quick video tutorial
for v9, but the steps are still the same.
Install Home Assistant Supervised
After Debian is installed, we now want to install Home Assistant <strong>Supervised</strong> to the machine (do not use any other installation method). Before continuing, make sure you have all the requirements already installed.
To start, Open a bash window on (or SSH terminal to) the Debian VM and log in as root:
sudo su
Download the Home Assistant supervised install script:
curl -Lo installer.sh https://raw.githubusercontent.com/home-assistant/supervised-installer/master/installer.sh
Once it’s downloaded, run the script with:
bash installer.sh
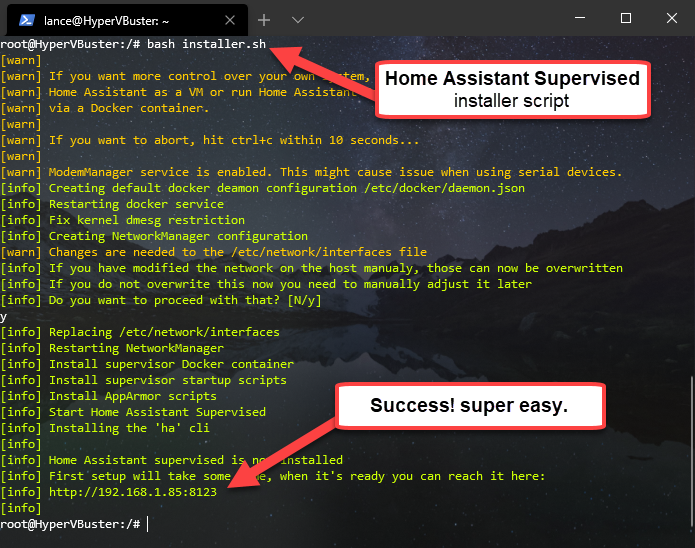
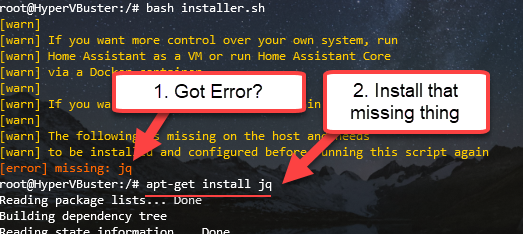
If you get any errors, the installer script error will tell you what is missing. To fix it just install what the script said was missing.
For example, if you get [error] missing: jq, then you need to install jq:
apt-get install jq
Important: Do not use any other installation method for Home Assistant. Yes, it is technically possible to do this with Home Assistant Core or Home Assistant Container approach, but that’s much harder as you will not have a Supervisor to manage everything.
Once Home Assistant is done installing, go to the IP address and port that installer showed you. In my case, that was http://192.168.1.85:8123
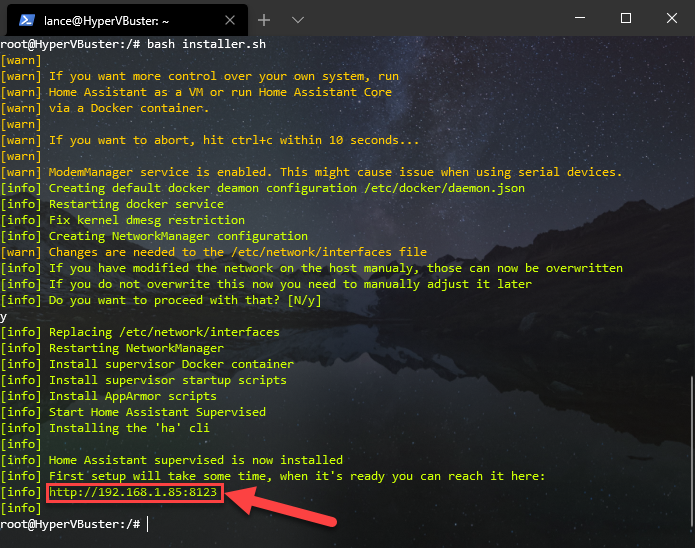
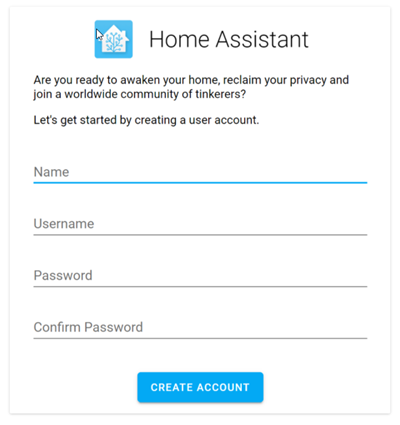
Go to that address, you should see the initial setup screen (see screenshot). Finish that process and put it aside for now. Don’t close it as we’re coming back to it shortly.
Phase 2. Install a USB over IP option
Now that you have a Linux host OS and Home Assistant Supervised installed, it’s time to deal with getting the USB device to the Debian VM.
There are several USB over IP options on the market. I will show you how to use two that I found were very easy to use
- USB Network Gate from Eltima (jump down to section 2A)
- USB Redirector from IncentivesPro (jump down to section 2B)
Option A - USB Network Gate
USB Network Gate was extremely easy to set up thanks to the fact that they have Windows and Debian installers … literally download, install, then plug & play. Here are the steps:
Windows 10
On the Windows 10 machine, go to the USB NET downloads page
and select “Download for Windows”, then run the downloaded exe file to install it.
Once it is done installing, launch the application:

Debian 10
Connect to the Debian VM’s desktop by right-clicking on the VM in Hyper-V and select “Connect”. Once you’re on the desktop, open Firefox and go to the USB NET downloads page
and and under Debian-Based select “64-Bit”. You will download a deb file.
Open Files app and go to your Downloads folder and Right-click on the deb file and select “Open with Other Application”:

Then select “Software Install” (instead of Archive Manager):
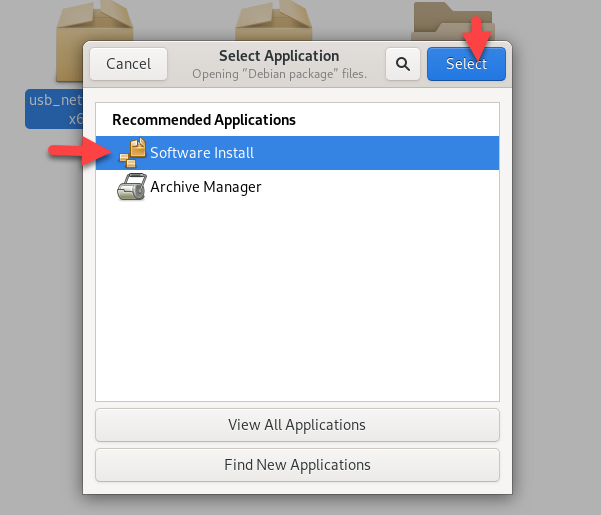
Finally, when the Software Install opens, click “Install”:

Once it is done installing, go ahead and launch the app (you’ll find it in your apps list)

Sharing the USB device
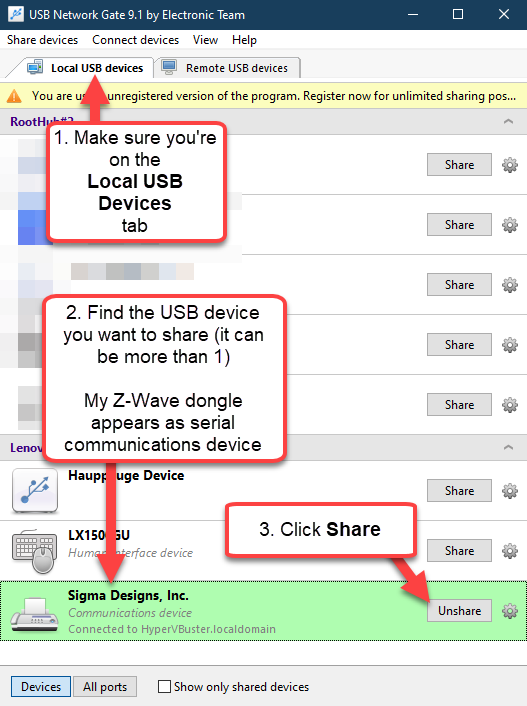
Now that you have finished installing the USB over IP software on both operating systems, it’s time to share the USB device.
On the Windows 10 you’ll see a list of all the USB devices, click the “share” button next to the Z-Wave dongle device.
Now, go back to the Debian desktop and select the Remote USB Devices tab, you should see the shared device! Go ahead and select it, then click “Connect”:

Option B - USB Redirector
Incentives Pro’s USB Redirector is another great option. Just install on Windows, install on Linux and choose which device to share. Here are the steps.
1 Install on Windows
Go to the USB Redirector downloads page, and download “USB Redirector”.

There are many items on the Downloads page, you want this one for the Windows host.
Run the downloaded file to install USB Redirector. When you’re done installing, launch USB Redirector and you’ll see a list of all the USB devices on the PC. Right-click on the one you want to share and select “Share USB Device”.

Right-click on the USB device you want to share.
Take note of the IP address of the Windows PC host and the port number you see in the list, you will need it later to add this server to the Linux client.
For example, let’s say your PC’s IP address is at 192.168.1.287 and USB Redirector shows it is accepting connections on port 32032, then your side note should look like this 192.168.1.237:32032.
If you do not know how to get the IP address of the Windows 10 PC, you can find easy instructions here .
2 Install on Linux
Linux is slightly different because we’ll be downloading and extracting a compressed file and then run an install script. If you spend any amount of time on Linux, this is completely normal for you a s frequent Linux user.
Step 1. Download
On the Linux machine, go to the USB Redirector downloads page. Scroll down to the <strong>USB Redirector for Linux</strong> section and choose the correct version for your hardware.

Linux has platform specific builds. Pick the right one for your hardware. If you are also running Debian 10.6 in Hyper-V, you’ll want the 64bit version (x86_64).
Once you’ve downloaded the file, extract the contents using your preferred method (CLI or GUI, doesnt matter).
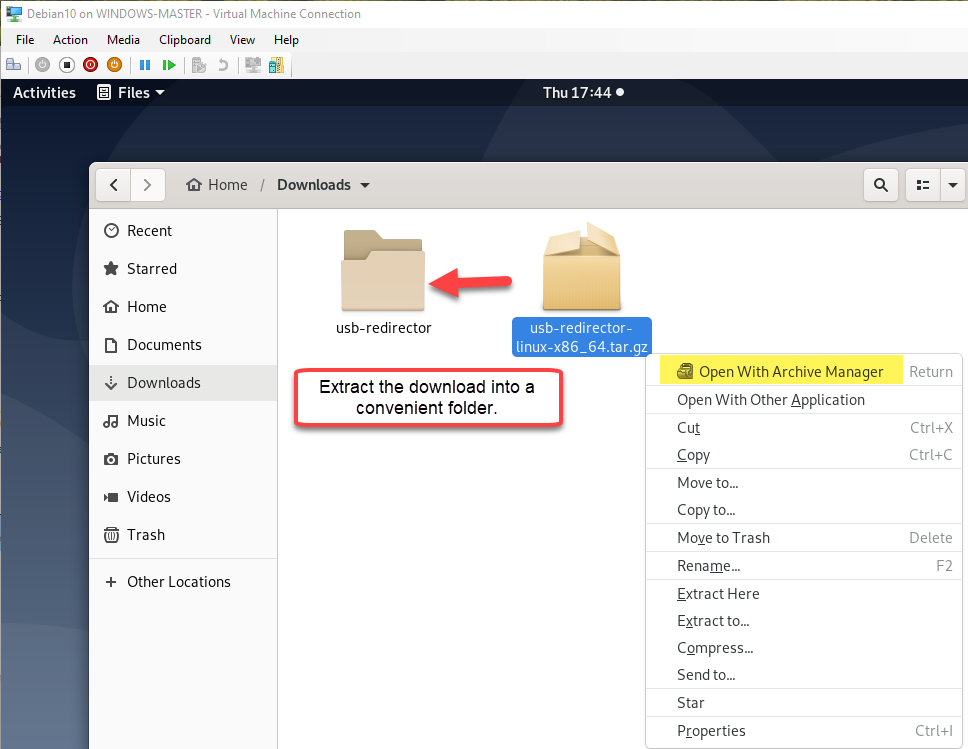
To keep things visual for this blog post, I chose to use the Files app.
Step 2. Install
Once it is extracted, go to the folder in SSH (or terminal) and run the following command
sudo ./installer.sh install
You should see the following result:
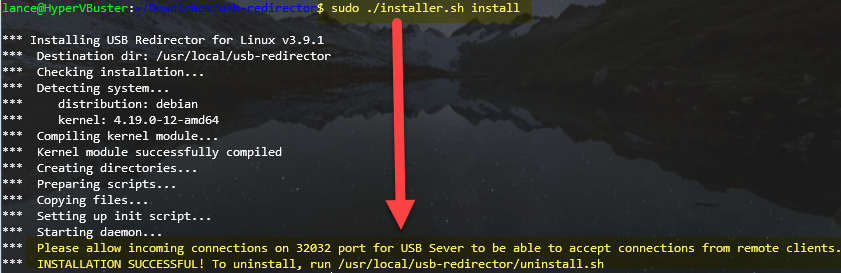
Troubleshooting : If you get an error about missing USB headers and it failed to install, go to the end of this blog post and read Troubleshooting Tip #1 for the solution.
Step 3. Share a USB device
You can see the complete instructions on the USB Redirector Cross-platform tutorial , but here’s a quick startup steps.
Using the IP address of the Windows PC and the port number (which you should have taken note of on the last step of Windows installation), add the USB Redirector server to the Linux client with the following command
usbclnt -add-server 192.168.1.237:32032
Next run the following command to a list of USB devices that are available to the Linux client. (take note of the device number).
usbclnt -list-devices
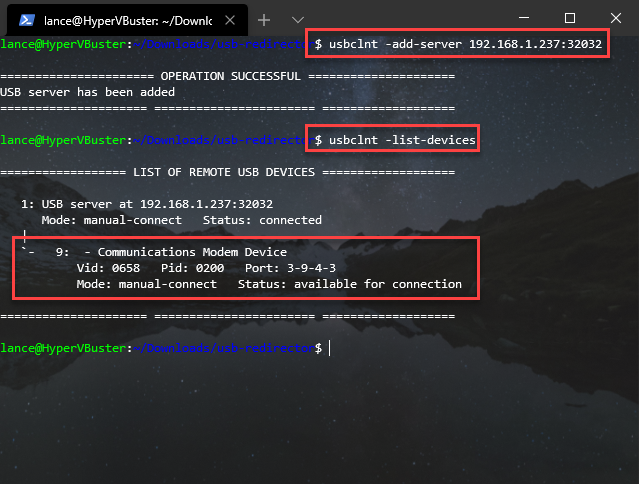
Important: Make sure you get the right number for the USB device. My screenshot shows the device at server 1: and device 9:, so my device ID will be 1-9 (your USB device will probably be different number).
Tip - If you do not see any devices listed, go back to the Windows 10 PC, open USB Redirector and make sure you’re sharing a USB device.
Now, you can take the last step and connect to that device using the server & device number with the usbclnt -connect command
usbclnt -connect 1-9
You will instantly see the Windows host’s USB Redirector show the USB device being shared with the client!

Success, the USB device is now shared with Debian OS.
Phase 3. Using the USB device in Home Assistant.
Regardless of which USB over IP option you chose (option A or option B), the USB device is now being passed from the Windows host OS to the Linux OS and Home Assistant should be able to see it now.
- Open the Home Assistant front end (remember, this is at the URL you used for initial setup, in my case that’s http://192.168.1.85:8123).
- Look in the side panel menu and select Supervisor.
- Now, select the System tab.
- Inside the “Host System” box, you should see a vertical ellipsis menu button, click that and select “Hardware” from the flyout.

You may be asking yourself, “Waaait a second, I though Windows was the host system?”. In this situation, Home Assistant has no idea that Windows is even involved, it only see the Linux OS as the host.
When the Hardware popup appears, look for the serial device’s name and copy-paste that value somewhere handy (we will need to use it shortly), it’s usually prefixed with /dev/serial/
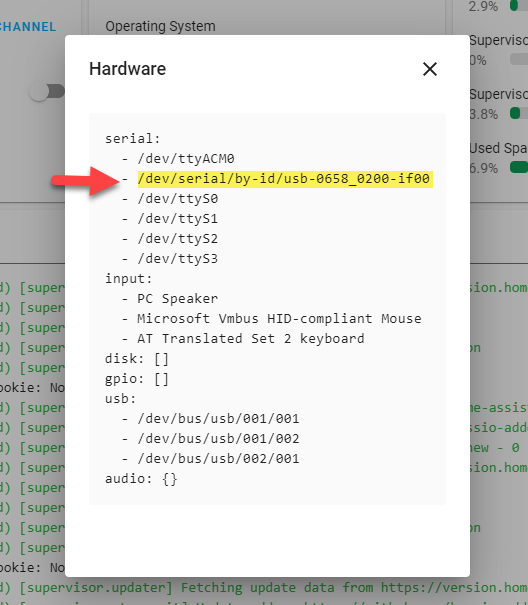
The USB device listed in Home assistant, copy that for use later.
Add-Ons
Now, go back to the Supervisor, but this time select the Add-On tab.
Install MQTT Add-On
This add-on is critical to many extra features of Home Assistant. Search for the Mosquitto broker add on and install it. Follow the numbered steps in this screenshot:

The Supervisor and is going to end being your favorite place to be. It automatically manages all the upgrades for all the containers in the system. Additionally, Add-Ons is where you can install all sorts of wonderful things and features for Home Assistant
Install OpenZWave Add-On
Now, search for and install the OpenZWave Add-On. Follow the numbered steps in this screenshot:

After it finishes installing, select it and switch to the Configuration tab. Inside the “Configuration” section, you’ll see a code editor area with two properties, device and network_key, that you need to set.
deviceis the USB value you copied from Supervisor > Host system > Hardware popup earlier (it starts with “/dev/serial/by-id/…”)network_keyis a hex security key. You can make a new one with this random key generator . Once you generate it, do not lose it. (if you have a preexisting key for an existing network, just use that instead).
Here’s an example of what it should look like:
device: /dev/serial/by-id/usb-0658\_0200-if00
network\_key: >-
  0xXX, 0xXX, 0xXX, 0xXX, 0xXX, 0xXX, 0xXX, 0xXX, 0xXX, 0xXX, 0xXX, 0xXX, 0xXX,
  0xXX, 0xXX, 0xXX
Click SAVE when you’re done entering the values. Don’t be alarmed if the config is reformatted for the save, see screenshot below for an example.
Under the Network section, enter 1983 in the ozw-admin port box and click SAVE button.
Here’s a screenshot of everything to help guide you

With the config done, switch to the Info tab and start up the OpenZWave (aka ozw) Add-On.

I recommend enabling some of the extra AddOn settings
At this point, you should be able to open the web UI for the Add-On and connect to the network

Integrations
We just finished the Supervisor Add-Ons, now it’s time to move on to the actual Home Assistant Integration. The Integration is what actually lets you control the different parts of the ZWave network from the UI or through scenes or automations.
In the side menu, select Configuration then Integrations

Next, click the “+” button to add a new Integration, then filter the list by “ZWave” and select OpenZWave:

After it gets added, click the Configure button, then the Confirm setup button.

Conclusion and After Thoughts
I you prefer Hyper-V and just wanted to add a USB-powered feature, this is an easy way to achieve it.
If you want to use a VM on your Windows machine for Home Assistant, and have no requirements to use Hyper-V, you may want to also look at using Home Assistant OS with VirtualBox because it natively supports USB passthrough, no need for USB over IP. You do not need a host OS like Debian because you boot directly into Home Assistant OS (aka HassIO). Just grab the VDI from the Home Assistant OS downloads and mount it as your VM’s disk.
Downsides
The only real downside I can see is that I have yet to find a 100% free USB over IP option. Most systems have free client apps, but the server will need a license after trial expires. Though, for this use case, you can use their cheapest option because you need only 1 server and 1 client.
Stability
You may also be asking yourself “How stable is this?”. The most important factor is the network connection between the VM and the host (internet not required). Since they’re usually sharing the same network adapters, it’s pretty damn good.
Troubleshooting
Tip #1
If you got an error during installation about missing headers, this is an easy and quick fix. Run the command to install the headers package for your distro (hoose ONLY ONE of these options ):
# Option 1 - Debian or Ubuntu
sudo apt-get install make gcc linux-headers-\`uname -r\`

# Option 2 - RedHat, Fedora or Scientific
yum install make gcc chkconfig kernel-devel-\`uname -r\`

#Option 3 - # SuSE
sudo zypper in make gcc kernel-devel
Once that is done, re-run the install script and it should work.
sudo ./installer.sh install
Transparency Updates
Updated Oct 26 - This is not a sponsored blog post, all the tools I mention here were organically discovered and implemented. The company that makes USB Network Gate reached out to me after seeing the blog post and offered a trial license upgrade in thanks. This was not arranged prior to the writing of this article and everything you read is still a raw and undirected personal experience.
Updated Oct 29 - Added USB Redirector installation section after finishing a conversation with their support team about installing on Linux. with the complete picture, I am now able to complete the article.