Installing Home Assistant on Hyper-V
Posted on May 25, 2020 • 3 minutes • 556 words
This post is a quick tutorial you can follow to get Home Assistant working on Hyper-V so you can take advantage of your PC’s compute power instead of running it on a Raspberry Pi. This installation method is really quick and doesn’t require any command line setup.
**Important**: If you want to use USB devices in Home Assistant, please this different tutorial -> [USB Support for Home Assistant on Hyper-V](https://dvlup.com/2020/10/23/usb-in-hyper-v/). The approach used in this article doesn't allow for USB devices.
Step 1 - Create Hyper V Machine
Download the VHDX file (hassos_ova-[version].vhdx.gz) from the home-assistant GitHub Releases page .
I recommend only using the latest non-beta release so you won’t have trouble with HA’s built-in updater. As of writing this, that is version 3.13:

Right-click on the downloaded
.gzfile, select “Properties”, check the “Unblock” checkbox and click OK.Extract the .vhdx file from the
.gzfile (you can use 7-Zip to do this). Don’t worry about where you extract it to, Hyper-V will make a copy.Open Hyper-V Manager app on Windows 10.
In the right pane, select Quick Create (at the top right).
Choose “Local Installation Source” option for an OS and use the extracted
.vhdxfile.You’ll be presented with the VM’s Settings window before starting it up. Here are some recommendations:
- In the Memory tab, set the RAM to at least 2048 MBs or higher and disable Dynamic Memory

- Under the Security tab, make sure Secure Boot is disabled:

- Under the Automatic Stop Action tab, change the setting to “Shut down the guest operating system”:

- Finally, select the Automatic Start Action tab and set your preferred option:

Start the machine and wait for initial setup to complete and you see the Welcome to HassOS prompt.

At this point, you should see the following:

You’re finished with the installation, theres one more thing to do so that you can access the machine from your network
Step 2 - Setup External Network Switch
The Default switch that comes with a HyperV machine doesn’t have access to the network that the host PC is using. You can easily add a new adapter and bridge it to the PC’s adapter.
- In Hyper-V manager, open the Virtual Switch Manager:

- Select “New Virtual Switch”, select “External” and click “Create Virtual Switch”

- When it’s created, you’ll see it in the left pane, select it to change the settings. First, give it a recognizable name, like “External Switch”. Next, select the External Network radio button and choose the network adapter that you want the new switch to use (in the screenshot below, you can see I chose the PC’s wireless adapter). Finally, click OK to save the changes.

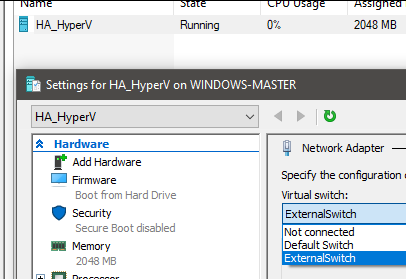
- Back in Hyper-V manager’s VMs list, right click on the VM and select Settings:

- In the Settings window, select the Network Adapter tab and change the Virtual Switch setting to use the new “External Switch” you just created:

Result
Now you can connect to Home Assistant because it is available on the network (that is connected to the same adapter you chose for “External Switch”). It should be visible on the netowrk as ‘homeassistant’:

A list of the devices on my network, the Hyper-V machine should appear as ‘homeassistant’
You can now access the machine using the IP address, plus the Home Assistant port “8123” (e.g. http://the_ip_address:8123) to start the onboarding experience.
